


Friday, January 24, 2014

Last Christmas I received wonderful muffin pans from my godmother. She's a very understanding lady and know me very well! I have been looking for muffin pans, so I called her to ask where I can find it in Selangor. I did not expect that she would give me muffin pans as Christmas gift and I was so exhilarated!
I wanted muffin pans so so bad after I saw some recipes on Pinterest. Yes, I never had muffin pans before and I bake them in mini tart pans like my chocolate chunk muffins and donut muffins. Still so adorable to see, but I wanted the REAL pan!
Actually I have baked a few cupcakes before I make this coconut cupcake, but some were eaten before I have chance to take picture and the rest were not really my family's favorite, so I don't bother to post it here. For this Creamy Coconut Cupcake, I think the combination of coconut and cream cheese is so unique and fabulous! What I love the most is the chewy shredded coconut inside. My family and friends loves it so much, that is why I think this recipe is a must to bake!

Creamy Coconut Cupcakes (translated to Indonesian)
Sumber : Ina Garten via The Baker Chick
Membuat : 12 buah

Bahan :
Untuk cupcake:
170 gr mentega, suhu ruang
200 gr gula
3 butir telur ukuran besar, suhu ruang
1 sdt vanilla extract
188 gr tepung serbaguna
1/2 sdt baking powder
1/4 sdt baking soda
1/4 sdt garam
1/2 sdm cuka makan + 120 ml susu cair (diamkan selama 10menit) -> untuk bahan BUTTERMILK
120 gr kelapa parut manis
Untuk frosting:
227 gr cream cheese, suhu ruang
170 gr mentega, suhu ruang
1 sdt vanilla extract
500 gr gula halus (masukkan sedikit demi sedikit sesuai selera)
Kepala parut secukupnya untuk hiasan
Cara :
1. Panaskan oven dengan suhu 165 derajat celcius.
2. Dalam mangkuk besar, mixer mentega dan gula bersama hingga lembut, mengembang, dan putih (sekitar 5 menit). Masukkan telur satu per satu, aduk rata sebelum memasukkan telur yang berikutnya. Masukkan vanilla extract dan aduk hingga rata.
3. Dalam mangkuk terpisah, campur rata tepung, baking powder, baking soda, dan garam. Masukkan campuran tepung dan buttermilk bergantian sedikit demi sedikit. Campur hingga rata. Masukkan kelapa parut.
4. Siapkan loyang muffin dengan paper liner. Isi adonan hingga 3/4 penuh. Panggang selama 20-25 menit, hingga bagian atasnya keemasan dan tusuk gigi yang dimasukkan bersih. Biarkan dingin di loyang selama 5 menit, kemudian keluarkan dari loyang.
Membuat frosting:
Mixer mentega dan cream cheese hingga lembut, masukkan vanilla. Masukkan gula halus sedikit demi sedikit hingga lembut. Hias cupcake dengan frosting dan kepala parut.
Enjoy ♥
With love
Julia ♥
Sunday, January 12, 2014

Seriously, I can't help myself to bake everyday! My hands feel extremely itchy if i just sit and do nothing. I love to be productive, feel so satisfied in the end of the day that I have learn something each day.
As I have restocked the baking ingredients at home yesterday, I am ready for another recipe! Yay! ♥
Chinese New Year is coming and I just can't wait! These few weeks before CNY, I have collected some recipes from my favorite blogs and webstites that I think will be easy to make and also yummy! One of the recipe is Rasa Malaysia's Cornflakes Cookies. It is a bit different from most of the cornflakes cookies in my place. In this recipe, she rolls the cookie dough into the cornflakes, whereas in our place, we usually mix the cornflakes with the batter together. And yes, I love the look! For the taste, just make sure you use high quality butter because all the taste and smell depending on it, and your cookies will be wonderfully crunchy and buttery.
Cornflakes Cookies (translated to Indonesian)
Source : http://rasamalaysia.com/

200 gr mentega
150 gr gula pasir
1 sdt vanilla essence
2 btr telur (kocok hingga tercampur)
300 gr tepung serbaguna
30 gr tepung maizena
60 gr cornflakes (remukkan, jangan terlalu hancur, kira-kira pecah sampai 2-3 bagian sudah cukup)
Cara :
1. Kocok mentega dan gula sampai pucat dan lembut.
2. Masukkan vanilla essense dan telur, kocok rata.
3. Masukkan tepung dan maizena, aduk perlahan. (Adonan tidak menempel di tangan saat disentuh)
4. Ambil 1 sdt adonan, bentuk bulat dan gulingkan ke cornflakes. Susun di atas loyang yang dilapisi kertas roti dan panggang dengan suhu 175 derajat celcius selama 25 menit atau sampai kuning kecoklatan.
Enjoy ♥
With love
Julia ♥
Thursday, January 2, 2014

Just a few months ago I found a kiosk in Sunway Pyramid selling this cool stuff and I was soooo excited. I think I have bought 4 kits so far, but I only finish this one after these few months. Hahahaa.. Sometimes I just need the mood to come out to do something, even if it's a thing that I like.
In the box, you will get a canvas with frame, a set of acrylic paints, brushes, and hanger. Basically, you only have to paint according to the number and that's it! It is pretty easy to do, really, it only requires patient. ;) I really love the outcome! It looks sooo pretty ♥
As I leave the box and all the stuff in Malaysia, can I just use the pictures I found from the internet? *puppyeyes* Thank you! xD

(google.com)

paint, paint, paint ♥ (infmetry.com)
With love,
Julia ♥
Tuesday, December 31, 2013
My favorite website recently is Koleksi Resep Keluarga Nugraha. Her recipes are straight to the point, easy to follow, and the pictures are lovely! I think she's no longer update her website, I wish she will post recipes again someday...
I decided to bake this bun because Ms Nugraha stated that the milk filling will melt in your mouth! Ohh, how can I wait any longer to try? Me and my family loves these buns sooo much! I should say this bun is the softest bread that I ever made, it is so soft even on the second day, anddd the filling DOES melt in your mouth! My mom keep asking me to bake it again, definitely a keeper! ♥
Milk Filled Bun (Roti Isi Susu)
Source : Keluarga Nugraha (in Indonesian)
Make 25 buns

Bun ingredients :
375 gr bread flour, sifted
75 gr castor sugar
20 gr milk powder
8 gr instant yeast
1/2 tsp salt
125 gr unsalted butter, softened, room temperature
Evaporated milk, for brushing dough (about 4 tbsp)
Mix well (egg mixture) :
1 egg yolk, lightly beaten
1 whole egg, lightly beaten
175 ml cold milk
2 tbsp condensed milk
Filling ingredients, mix well :
150 gr unsalted butter
30 gr powdered sugar
75 gr milk powder
Method :
1. In a big bowl,mix together flour, castor sugar, milk powder, yeast, and salt.
2. Pour egg mixture little by little, knead to combine.
3. Add softened butter, knead until dough is smooth, soft, and elastic.
4. Cover the bowl with plastic wrap and let dough proof for 30 mins until dough has doubled in volume.
5. Deflate dough using the heel of your hand, and divide into 30 gr balls.
6. Let rest for 30 mins until dough puffed up.
7. Flatten dough to 1 cm thick and filled with about 1 tsp filling, roll into tight balls and place on a parchment lined baking sheet.
8. Cover with plastic wrap and let rest for 15 mins. Preheat oven to 180°C.
9. Brush the dough surface with evaporated milk and bake for 30 minutes.
Enjoy ♥
With love,
Julia ♥
Saturday, August 10, 2013
Hello sweethearts! ♥
Several days ago is my dad and little brother's birthday.
Okay. He's not little anymore.
He is 13 years old this year, but still he is my sweet little brother. They are the only guys in the house and share the same birthday, isn't it sweet? I always think so! ♥
So for the very first time, I baked a birthday cake! Yay!
For both layer, I baked carrot cake with cream cheese frosting. I forgot to take picture of the inside part due to the nervousness while making this. Hahaha.

For the white fondant, I use marshmallow fondant recipe that I found online and the black fondant is store-bought. Marshmallow fondant is actually too sweet for me (although I am a sweet tooth person) and the store-bought fondant tastes quite nice! I think next time I will just buy ready-to-use fondant.

I put a few drops of food coloring to the white fondant for the roses. To make the roses, I just cut it into a rectangle and roll it. So easy and cute ! xD


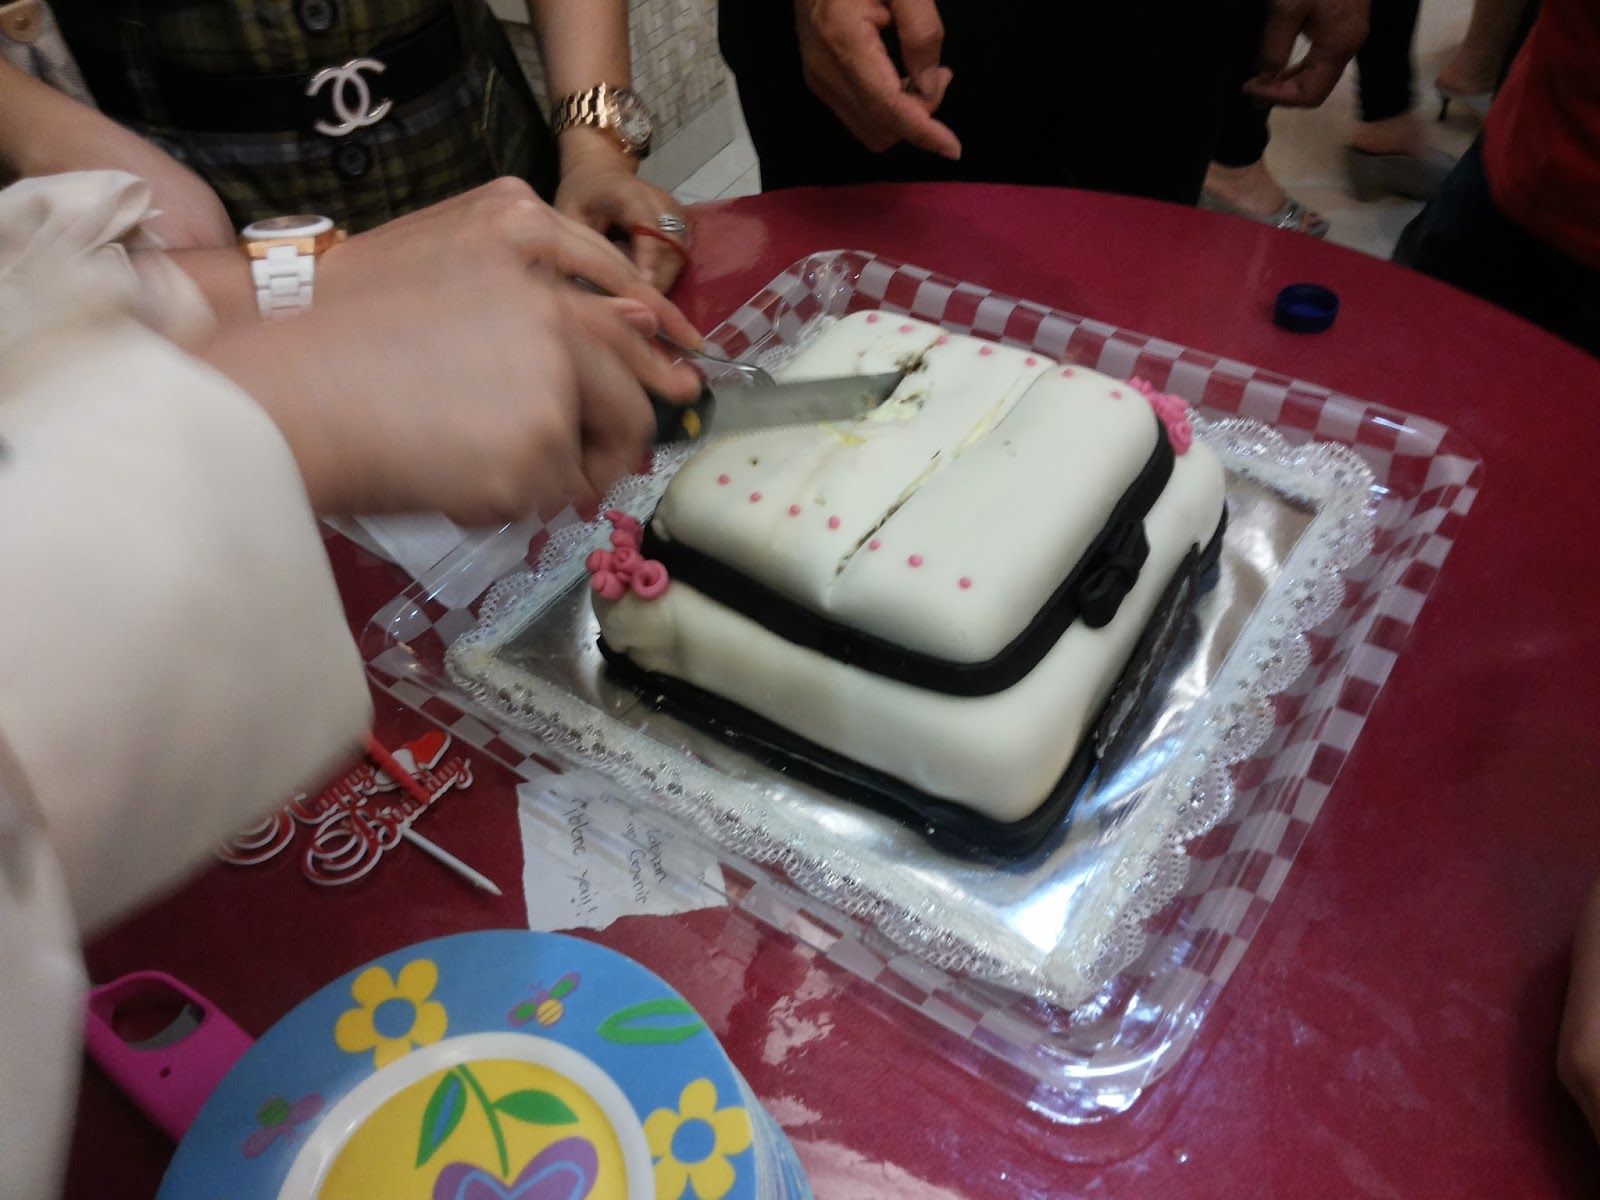

I am sooooo happy that they all like it although it was a bit too sweet! Hope that I can make another birthday cake, it's a super exciting thing! ♥
With love,
Julia ♥
Saturday, August 3, 2013
Hello my lovely cookies! ♥

After a long hiatus, I open my blog again! *yayy* Yes, I just open it after this all months. I have been focusing on my assignments and exam, and of course crocheting and all. I found another addicted hobby, cross-stitching! I have so much fun with it and now I can feel that my hands are so itchy to do it again! xD
And guess what, it is another holiday again~! I am having semester break now and trying to enjoy each day as much as possible! Another posts is coming ;)
By the way, I will continue the 5th semester next month. Yup, 2 more semesters to go! I have to try my best to finish this and start to think about my future career, confusing matter indeed, because I have lots of things in mind to do! xD
I write the recipe in Indonesian, so if you're looking for the recipe in English, click here to check the original recipe by Joy of Baking. ;) So here's the recipe for today~

Bahan Dulce de Leche :
1 liter susu
150 gram gula pasir
2 sdm light corn syrup
1/2 sdt baking soda
1/8 sdt garam
150 gram gula pasir
2 sdm light corn syrup
1/2 sdt baking soda
1/8 sdt garam
1 sdt vanilla extract
Bahan Shortbread Cookies :
260 gram tepung serbaguna (segitiga biru)
1/4 sdt garam
1/4 sdt garam
226 gram mentega tawar, suhu ruang
60 gram gula halus / bubuk
1 sdt vanilla extract
1 sdt vanilla extract
Cara :
Dulce de Leche
1. Tuangkan susu, gula, corn syrup, baking soda, dan garam ke dalam panci 8 liter. Panaskan dengan api sedang hingga mendidih. Perhatikan dengan baik, apabila susu mulai berbusa dan naik, segera aduk dengan spatula tahan panas atau sendok kayu dan kecilkan sedikit api.
2. Terus masak campuran susu tersebut, aduk bagian dasar dan pinggiran panci sampai campuran susu menjadi sangat kental, lengket, dan berwarna karamel (sekitar 40-60 menit). Campuran harus terus diaduk agar campuran susu tidak hangus.
3. Setelah 40-60 menit, Dulce de Leche telah berkurang hingga 300 ml. Angkat dari api dan saring. Masukkan vanilla extract dan aduk. Biarkan dingin sebelum ditutup dan disimpan. Dulce de Leche dapat disimpan di lemari es selama 1 bulan.
Shortbreads
1. Kocok mentega dengan mixer hingga lembut dan putih.
2. Masukkan gula dan kocok hingga rata.
3. Masukkan vanilla extract, aduk.
4. Masukkan tepung dan garam dan campur hingga rata.
5. Bentuk adonan hingga menyerupai piringan, bungkus dengan plastic wrap, dan masukkan ke lemari es paling sedikit 1 jam atau hingga mengeras.
6. Di atas permukaan yang telah ditaburi tepung, giling adonan hingga ketebalan 6cm. Potong dengan cookie cutter bentuk lingkaran berdiameter 5cm (bentuk lain juga boleh, di sini saya menggunakan bentuk hati).
7. Susun di atas loyang dan masukkan lemari es selama 15menit.
8. Panggang selama 7-10menit dengan suhu 177 derajat C, atau sampai pinggiran cookies kecokelatan.
9. Cookies dapat disimpan selama 1minggu di wadah kedap udara.
Alfajores
1. Oleskan 1 sdt Dulce de Leche di atas permukaan cookie dan tutup dengan cookie lainnya.
2. Taburkan gula halus di atasnya. Dapat disimpan beberapa hari di dalam lemari es.
Untuk 24 Alfajores cookies.
Adapted from JoyofBaking.com
Shortbreads
1. Kocok mentega dengan mixer hingga lembut dan putih.
2. Masukkan gula dan kocok hingga rata.
3. Masukkan vanilla extract, aduk.
4. Masukkan tepung dan garam dan campur hingga rata.
5. Bentuk adonan hingga menyerupai piringan, bungkus dengan plastic wrap, dan masukkan ke lemari es paling sedikit 1 jam atau hingga mengeras.
6. Di atas permukaan yang telah ditaburi tepung, giling adonan hingga ketebalan 6cm. Potong dengan cookie cutter bentuk lingkaran berdiameter 5cm (bentuk lain juga boleh, di sini saya menggunakan bentuk hati).
7. Susun di atas loyang dan masukkan lemari es selama 15menit.
8. Panggang selama 7-10menit dengan suhu 177 derajat C, atau sampai pinggiran cookies kecokelatan.
9. Cookies dapat disimpan selama 1minggu di wadah kedap udara.
Alfajores
1. Oleskan 1 sdt Dulce de Leche di atas permukaan cookie dan tutup dengan cookie lainnya.
2. Taburkan gula halus di atasnya. Dapat disimpan beberapa hari di dalam lemari es.
Untuk 24 Alfajores cookies.
Adapted from JoyofBaking.com

Pretty simple and delicious! The sweetness is just nice and even my non-sweettooth family members love it! Enjoy :D
With love,
Julia ♥
Saturday, February 16, 2013
Or maybe 'Happy Belated Valentine's Day'? Hm...
Anyways, I had a very lovely Valentine's Day! ♥


I made chocolate cornflakes for my friends and colleagues from the hotel I'm working, and enjoy it so much! They were like 'Wow, how you make this?', but oh it's a super simple things to do, people. Just mix together melted chocolate and cornflakes, and TA-RAA~~~~ You have these! xD
For the exact measurement and directions, click here.
I was so excited while making this and forgot to take pictures! So I just took some after I finished everything and take this picture below from my friend. Thanks for the picture, Felicia! ♥

I realized that some people tend to hate Valentine's Day simply because they don't have partner, like boyfriend or girlfriend, etc. But why? You can still share love and make people smile, isn't it the greatest thing ever? And yes, frankly I say, I am single and love my Valentine's Day so much! ♥
Hope you enjoy yours too ♥
With love,
Julia ♥
;;
Subscribe to:
Posts (Atom)


